Overview
In the following image you see the basic structure of CashCtrl:
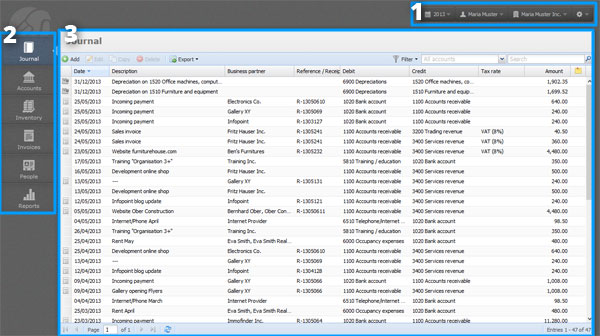
- Meta menu [more]
The meta menu contains mainly supporting functions outside the core functionality:
Fiscal period, User, Organization, Settings - Main menu [more]
The main menu contains the different modules (core functions) of CashCtrl:
Journal, Accounts, Inventory, Orders, People, Salaries, Files, Reports - Module [more]
The module selected in the main menu, here the Journal as an example, takes up the most space in the window.
Meta menu
The meta menu contains mainly supporting functions outside the core functionality:

From left to right:
Fiscal period [more]
Here you can switch between the different fiscal periods, create new ones, complete and reopen them.
User [more]
This is where your user name is displayed and you can adapt your personal user profile or log out of the application.
Organization [more]
The name of the current organization is displayed here and you can switch between your organizations and create new ones. As administrator you can also manage the current organization and its users & roles.
Settings [more]
Here you can change general settings. Also you'll find help (this manual) and support here.
Main menu
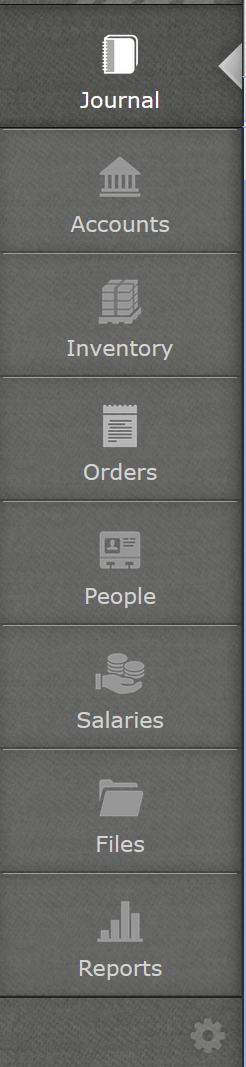 The main menu contains the different modules (core functions) of CashCtrl:
Journal [more]
The journal contains all book entries, automatic as well as manual ones. Automatic book entries are generated e.g. by invoices, fixed assets and depreciations. You can create manual book entries here directly.
Accounts [more]
Here you'll find the chart of accounts, bank accounts and cost centers. Accounts are organized in categories and both can be managed here.
Inventory [more]
The entire inventory of your organization is managed here: (stock) articles, services and fixed assets.
Orders [more]
Here you'll find the entire order processing with sales and purchase documents (like offers, invoices, etc.).
People [more]
All persons (natural as well as legal persons) with which the organization is associated on business are managed here: Customers, vendors, employees, etc.
Salaries [more]
This is the payroll module where you will find salary statements and certificates for your employees.
Files [more]
The file manager where attachments like for example receipts, images as well as arbitrary files can be managed and categorized.
Reports [more]
Here you can compile various reports (summaries) like e.g. balance sheet, profit & loss statement, etc. and print them as a PDF.
![]() Here you can show and hide menu items.
Here you can show and hide menu items.
Module
The module selected in the main menu, here the Journal as an example, takes up the most space in the window. The structure of the different modules is always approximately the same. An example:
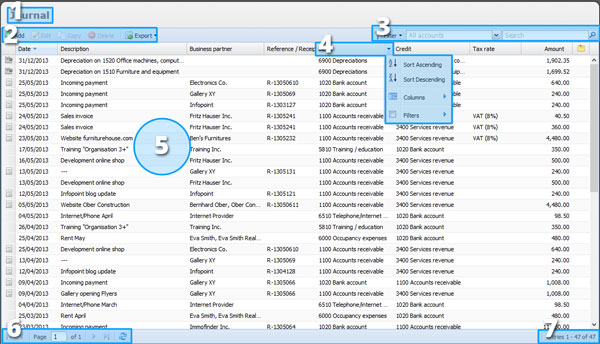
- Title of the module (here: "Journal").
- Actions
One the left side all actions on entries of the table are executed:
- Add, edit, copy and delete entries
- Export as PDF or Excel
- further module-specific actions - Search & Filter [more]
On the right side you'll always find the search, saved views and various module-specific filters. - Column with menu [more]
Most modules display their entries as a table. Each column in this table provides various functions:
Sort, change order, resize, show/hide, filter.
The column menu is opened by clicking on the far right of the column title (by hovering with the mouse you'll see an arrow pointing downwards).
The first column doesn't have a menu and cannot be moved. By clicking on this column the entries are sorted by the "natural sorting", i.e. in the order they have been entered. - Entries
Entries (Journal book entries in this example) are always displayed in table form. They can be manipulated in various ways. An entry is selected by clicking on it (1 row). If an entry is selected, the corresponding actions in the toolbar above become active, e.g. edit, copy and delete. With the Shift key multiple entries can be selected: Just click on the first entry and then Shift+Click the last one and all entries in between are being selected. With Ctrl+Click an entry is added or removed from the current selection. With a right-click the context menu is displayed which provides the actions edit, copy and delete again. - Paging
Below on the left side you can browse through the entries. Usually 50 entries are displayed per page. Buttons from left to right:
First page | Previous page | Current page | Next page | Last page | Refresh - Information
Below on the right side various information about the entries is displayed. Always on the far right side you'll find information about the amount of entries displayed and the total amount of entries (e.g. "Entries 1 - 30 of 30"). Further information can be displayed like the sum total of selected entries, depending on the module you're in.